Intro
Lately, more and more overland enthusiasts have been switching from the slightly outdated and short ranged CB radio into the amateur radio world. Don't get me wrong, CB radio has it's place as a communication medium for us Overlanders however, here in Georgia we find our-self out of range quickly and solid communication really only happens when you are close on an open highway. Reception quickly deteriorates once we hit the trail and if the group splits up, CB has been near useless for us.
The solution has been a shift within our overland group, and many others, into HAM Radio. With a proper setup, we can not only do point to point (simplex) like a normal off the shelf walkie talkie, but we now have the ability to bounce a transmission off a repeater. This greatly increases our coverage area and communication abilities.
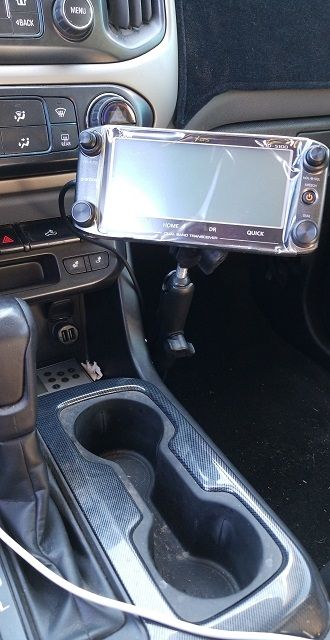
Not to mention that a radio such as the ICOM ID-5100A has D-STAR capabilities, which is digital voice. In short, the radio can tune to a D-STAR repeater gateway and transmit voice and data to other repeater gateways that can be linked via Reflectors. Basically, we can now have worldwide communications from the middle of the woods, desert, or any remote location that has coverage from a repeater.
In today's blog, we are going to cover how I installed the ICOM ID-5100A into my Chevy Colorado.
Materials
Here is a list of everything that I used for the installation of the radio:
- ICOM ID-5100A x1
- ICOM IC-MBF-4 x1
- Diamond K400S-NMO Lip mount x1 (Optional / up to personal preference on mounting antenna)
- COMET-NCG CA-2X4SRNMO x1 (Optional / up to personal preference on antenna selection)
- RAM® High-Strength Composite Drill-Down Mount with Diamond Plate x1
- Ram Mount Long Double Socket Arm for 1-Inch Ball Bases x1
- Ram Mount (RAM-B-230U) Double 1-Inch Ball Adapter x1
- Nite Ize Original Steelie Dash Mount Kit - Magnetic Car Dash Mount x1
- M5-0.8 x 16 mm Zinc-Plated Steel Hex Bolts (2-Pack) x1
- M5-0.8 x 12 mm Hex Bolts x1 (Home Depot also has them but not on their website....)
- 2-Pieces M5-0.8 Zinc-Plated Metric Nylon Lock Nut x2
- M4-0.7 x 20 mm (Pack of Two) x1 (Home Depot has them but not on their website....)
- 4 mm - 0.7 Zinc-Plated Metric Nylon Lock Nut (2-Piece) x1
- 12 - 10 AWG, 5/16 - 3/8 Stud Size Vinyl-Insulated Ring Terminals x1 (Note: I usually get the Heat Shrink ones.
- Some rubber gromment to protect the wires through the firewall. I can't remember what size I bought.
Step One: Running Power and Antenna Placement
I chose to run my antenna on the hood, driver side, leaving around 4-6 inched for future ditch brackets / lights. Mounting the Diamond Lip Mount is pretty self explanatory and I'm not going to cover doing so. The mount comes with 14 feet of coax attached to it, we'll go over routing it later in this step.
The radio includes an 8(?) foot power cable which was plenty for me. If you are thinking of mounting under the rear seats, consider buying the longer power cable.
The ends come pre-tinned and ready for a ring terminal to be crimped on. You can also solder them onto the terminal if you desire. Note: I save this for last as it makes routing the cables through the firewall easier. Also, remove the included inline fuses, as this also helps route the cables.
For my install, I decided to go through the firewall on the drive side, where the manual clutch pedal would normally be. There are portions of the insulation already cut and you can pull out.
NOTE: BE EXTREMELY CAREFULLY DOING THIS.
DO NOT MAKE THE SAME MISTAKE I DID!!!!
In all my wisdom, I overlooked the position I choose and I drilled into my brake booster, costing me several more hours of labor to fix it, and around $100 for a new brake booster. I should note that this is a PITA to fix!!!!!
USE A STEP BIT.
DOUBLE and TRIPLE check your drilling position.
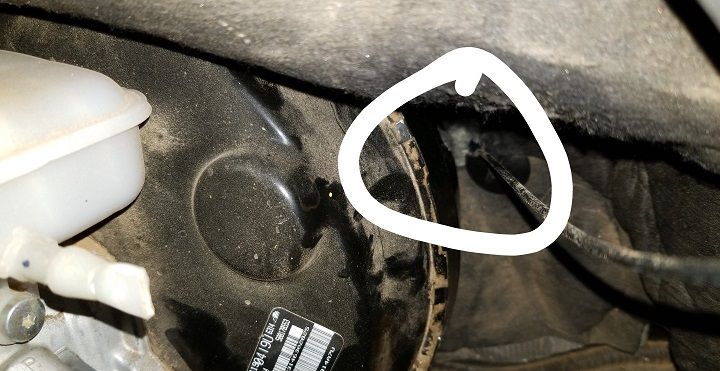
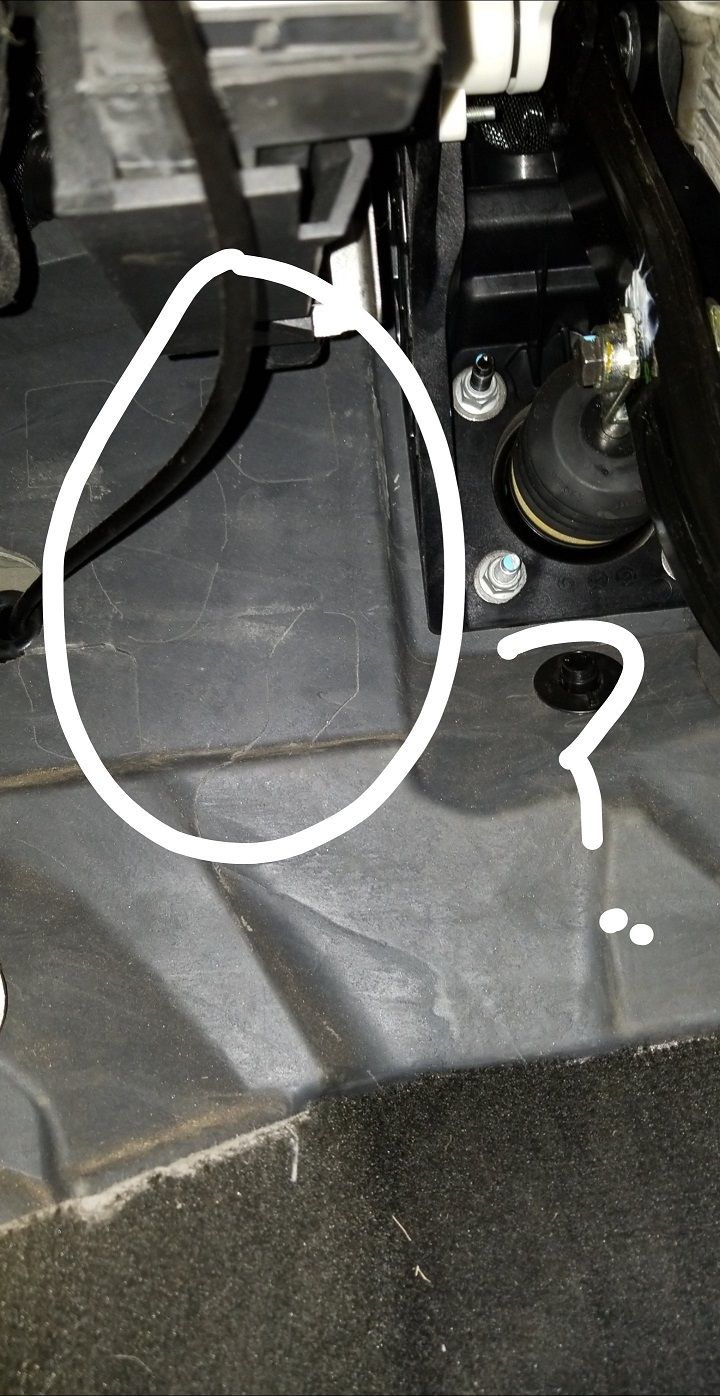
In that second photo you can see the pre-cut areas, I decided to go through the block on the top right. Once again, if you chose the same. Please use a step bit and do not risk hitting your brake booster.
Pick your location, drill the hole, out in grommet, run your power wires as well as the antenna wire. Then use fire foam to seal it. I sealed mine after I had finished placement of all items to ensure I had the proper length of wire where I needed it.
Step Two: Main Unit Placement
I chose to mount my main unit on the driver side center console side plastic, as pictured below.
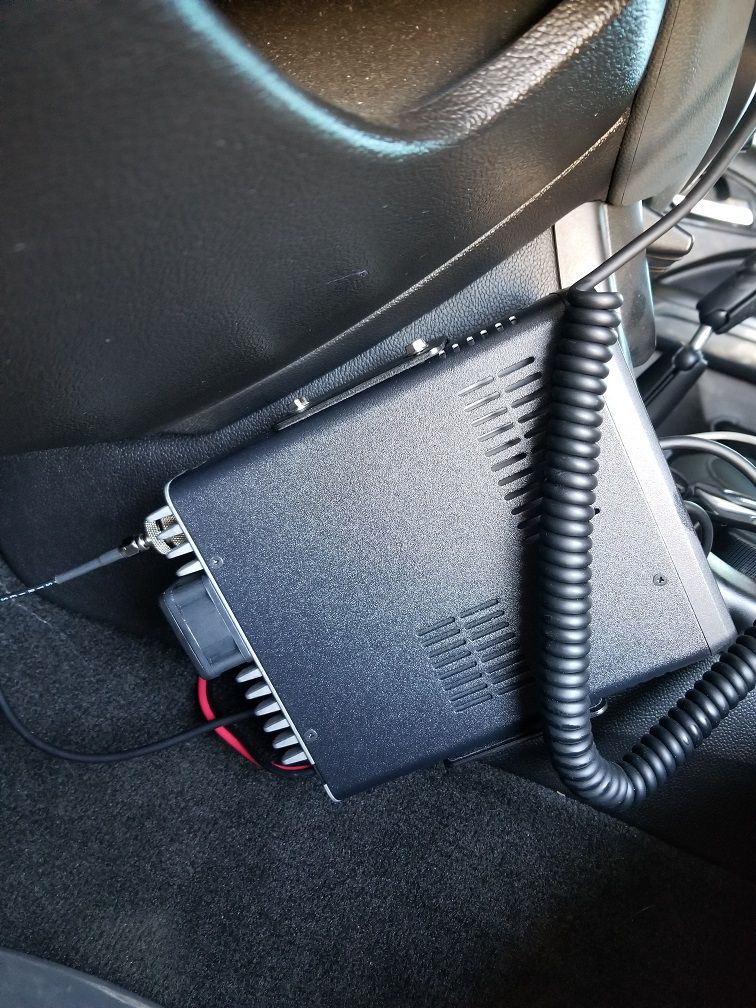
I first placed the mounting bracket in a position I liked, and then also loosely installed the main unit body into the bracket to see if I liked the position of it while the main unit was in the bracket.
With the main unit installed, I make a mark on the lower side of the bracket to mark its position. Then I removed the main unit from the bracket. I placed the bracket back into position, aligning it with the mark I made, and then marked the 4 cut out areas for bolts in the bracket on the plastic.
From there I removed the side plastic and observed if there where any clip mounts in the way of drilling. The nice thing about this bracket is the 4 areas to bolt through give you a bit of room, so this isn't an issue. I made 4 more marks and drilled a hole for the bolts to go though. I went just as big as the bolts, which I had to manually screw in the bolts.
Note: The bolts and nuts I used for the bracket are included with the bracket and NOT the ones purchased above.
Once you have the bracket fastened to the side plastic. Install the radio into the bracket before putting it back in. I did this because as you can see there isn't much room to play with for the top two screws.
Once that's done, install the side plastic with radio into the truck.
Step Three: Head Unit RAM Mount Install
Much the same as the above, I chose to install the RAM mount base on the passenger side center console plastic, as seen below.
Note: This is where the nuts and bolts we purchased above come in!
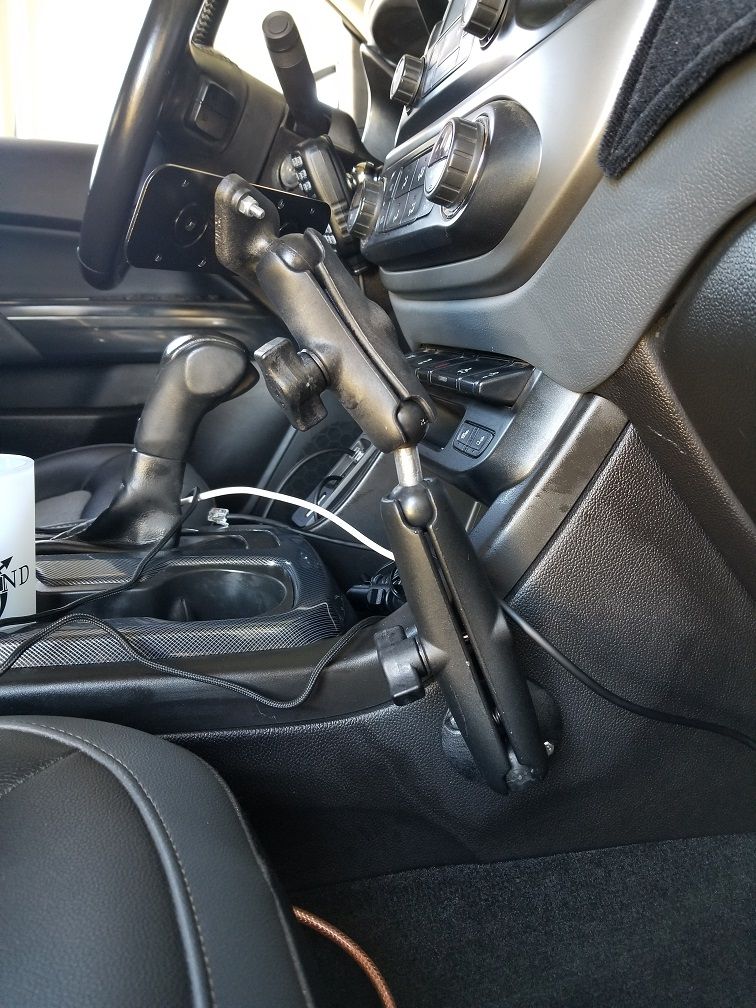
I choose the location in the photo above because it was 1) the most flat area of the center console and 2) it allows the glovebox to be opened. You can mount your's anywhere you'd like.
The process is much the same as above. I removed the circle base mount and found a position I liked, marked the 4 holes, drilled the 4 holes, and finally bolted it through.
Note: here that I had to use 1 of the 16mm bolts due to it being on a plastic seam and the other 3 are the 12mm.
Once the circle base is fitted, you can return the side panel to the truck and then attach the arms.
I put the long arm on first, then connected the double ball joint, then the short arm.
For the Diamond Plate attachment I took the mounting bracket (included with the radio) and bolted it on with the M4 bolts and locknuts. I did this in a diagonal because the diamond plate attachment was too long horizontal. You can see how in the photo below. Like this, the holes line up perfectly.
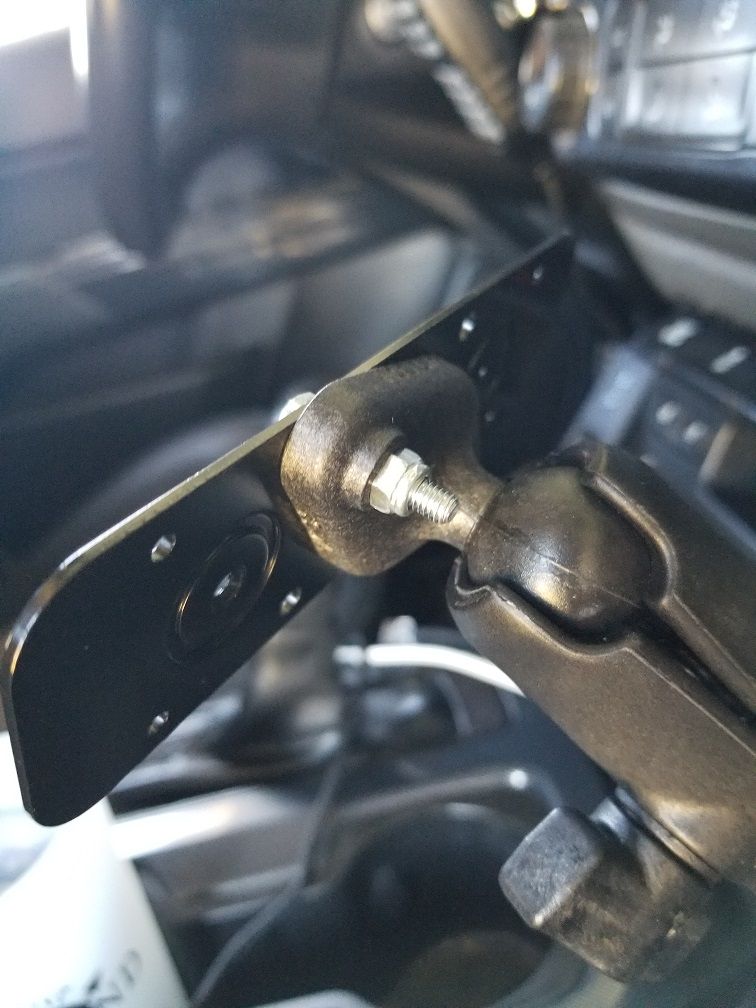
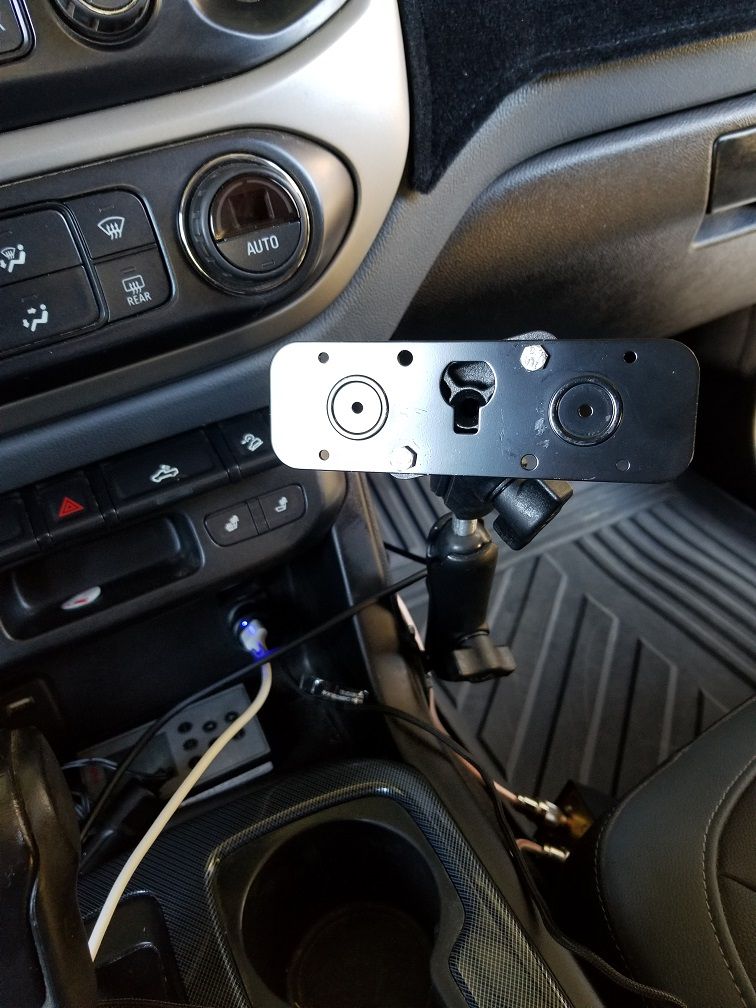
You can then screw on the two magnets that came with radio onto the head unit and it will attach to this plate.
I've had no issues with it falling off :)
Step Four: Microphone Placement
By now you are probably wondering why we purchased that little Steelie magnetic ball mount thingy. Now I can show you, it's as simple as this:
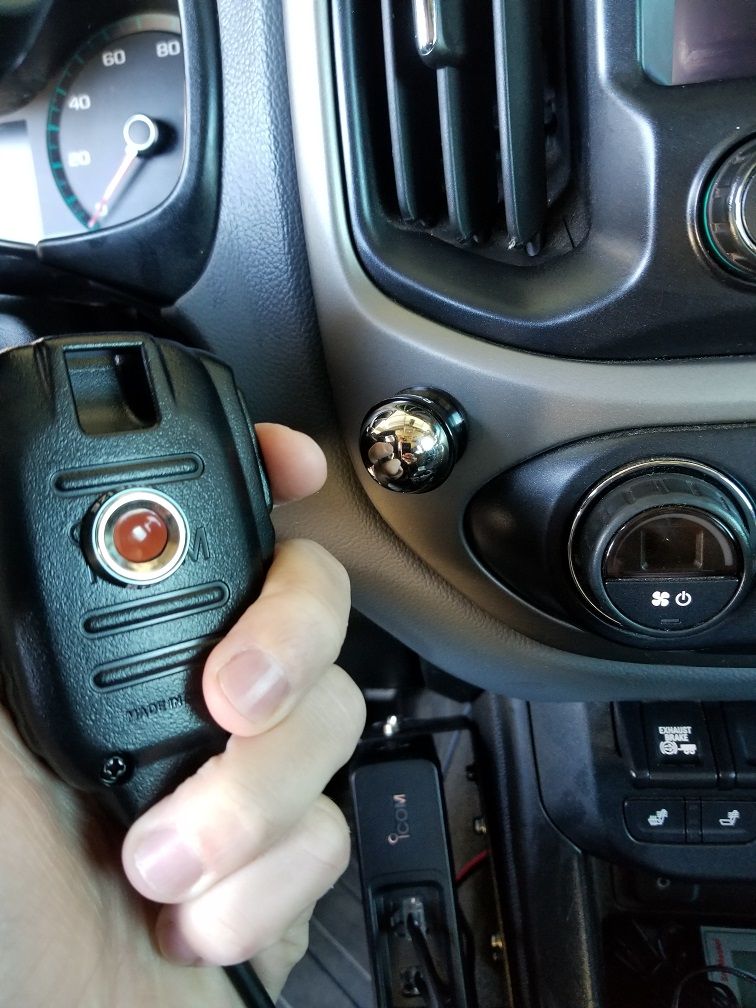
Just wipe down the area you wish to attach the mount too (pads included in the kit) and slap that sucker on. Then attach the little magnetic mount thingy to the back of the mic and there you have it.
I love this because you can rotate the mic around, note that it doesn't get in the way of my keys or the air conditioning controls at all.
Step Five: Cable Management
I tucked most of the cabled behind the center of the console, I think this photo will explain.
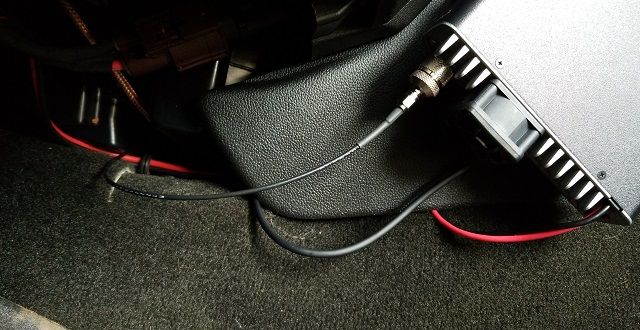
There is a nice gap where you see the small coax cable and the other gold coax cable go through. I put the bulk of the head unit wire back stuffed back there.
I ran the power under the plastic to help keep it out of the way.
The small coax actually wrapped around to the passenger side center console and I tucked it behind the plastic piece when I had it off to install the RAM mount.
Note: You're not supposed to coil coax, or so I've been told. That's why I ran it the way I did.
Conclusion
I hope that you enjoyed reading about this install and that it helped you out if you are planning to do the same
I also hope that maybe this inspired you to also become a HAM Radio Operator. I'll be honest, since my license was issued, I've really enjoyed interacting with other HAM's and learning the in's and out's of operating on the network.
I truly believe that this is an amazing resource for overlanders to utilize and enjoy, while enhancing communication potential ten-fold on the trail!
Until next time, strap in and enjoy the ride!
